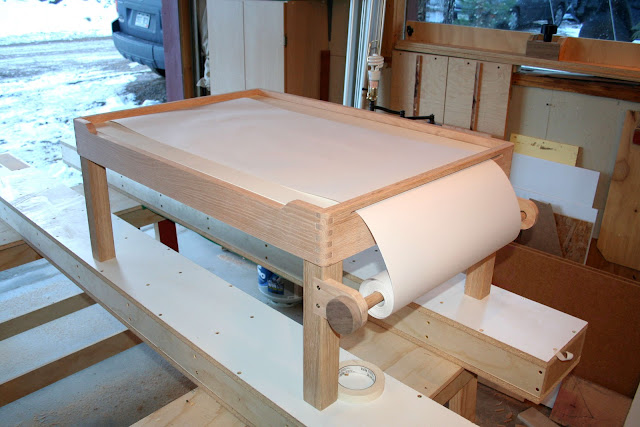
This table is designed to enable train play as well as craft work (drawing, writing, etc). Most play tables out there are designed for either/ or but none really for both. Train tables are set apart by the rim around the table to keep the trains and tracks on the surface, but this impedes writing at the table. Craft tables don't have this rim and look more like a regular desk.
I combined both into my own design by cutting out a portion of the front rail making it flush with the table top enabling easier writing and drawing, and I cut a slot into a side rail to feed the paper through when writing. By cutting a slot, you still have a rim to hold the trains and toys on the table top.
I used white oak for the legs, and red oak for the rails and dowel brackets. The table top is 3/4" melamine. The dowel 'wheel' is walnut. There is a maple cross support beam under the table.
Cutting and fitting the box joints:
They were cut on the table saw with a simple homemade box joint jig.Combination square and knife used to make slight marking cut which will reduce tear-out on box joints.
 |
| Chamfer here was cut on the table saw with blade at 45 degrees |
 |
| Round over completed with files and rasps |
Legs:
The legs were cut from 8 quarter material and planed to a final thickness of just under 2 inches. To attach them to the table top I cut a half tenon, or half lap which the table top rails will rest on. The top portion of the tenon will act as a support for the tabletop. The half laps were cut on the table saw with a dado blade.
In this pic I have put the leg blank in a notched block which puts the edges up and I
am hand planing a round over on each edge.
Rail Cutouts:
The table top rails have some features that allow the table to act as a train table and a drawing table.
 |
| Cutting a stopped slot on the horizontal router table with a 1/4" spiral up-cut bit. |
 |
| Cutout here was first done on table saw with dado blade, then coping saw to trim close to profile |
 |
| File and rasps and chisels clean up the profile |
 |
| Finish sanding gets it ready |
Dowel Brackets:
The paper roll is housed in a dowel supported by brackets that are mortised into the legs.
 |
| Using hardboard template for mortise layout |
 |
| Layout marked with knife |
 |
| Chisel work to clean out mortise |
 |
| Forstner bit used to drill hole for dowel. Backing board underneath to reduce tear out. |
 |
| Jigsaw used to cut profile. |
 |
| Completed mortise and bracket. Bracket cleaned up with files and rasps. |
 |
| attaching the bracket with glue and screws. |
 |
| Completed bracket in place |
Cross beam construction: a maple rail set into notches in oak brackets.
PEN HOLDER:
There is a small channel (cut with cove bit on the router table) to hold pens and pencils that I cut into a 1/2" piece of oak. This piece is set into a rabbet on the front edge of the melamine table and comes flush with the table top.
 |
| Cove cut into pen holder blank - final width trimmed on table saw after cutting cove on router. |
 |
| Rabbet cut into table top with dado blade and sacrificial fence on the table saw. |
 |
| Table top in place, with pen holder set into rabbet. All comes flush to the top. |
Completed Table below


